Wednesday, June 22, 2011

DIY "Silk Screening"

Mike and I wearing our "formal wear"


I fell in love with the art of silk screen in college when I was fortunate enough to be the first class at Umass  Amherst to have this as a studio option. While we didn't silk screen t-shirts as most people do, (We were way to artsy and formal for that) I found a love for the art and couldn't transfer it to my life outside of class. I realized this isn't a skill that can be practiced easily without all the proper equipment. What I would like to show you is the closest thing I have been able to do on a small budget outside a proper silk screen studio. I have used this technique a few times to achieve a silk screen effect including for my husband's thirtieth birthday party. Below you will see how I made our party shirts that looks professional.

*I do realize that not everyone has a degree in art or a knack for painting but with these steps I bet you could do a lot more than you think by keeping things simple and sticking to basic shapes and colors.


Supplies

Pen
Scissors
Iron
Paint brushes
Water
Puff paint
Reynolds' freezer paper


Plan out what you want the stencil to look like and then carefully cut it out. For this technique you need to keep it simple, so don't try to cut out a very complicated design.


Lay the stencil on the garment you want to paint shinny side down. Once the stencil is exactly where you want it use a hot dry iron to adhere the stencil to the garment.


Paint in your design using watered down puff paint. I use puff paint because it is a cheap paint that works on cloth, but I like to thin it with water to make it more like an acrylic.


Once the paint dries peel away the stencil to reveal a clean crisp line much like a screen print.


One of the down falls of this method is the stencils are only a one time use :-(

I used this method to make fun party wear but you could use this for team tees, bachelorettes, kids birthday parties, etc.

Tuesday, June 14, 2011

Beautiful Budget Brunch

Bridal showers and bridal luncheons have become more and more extravagant and normally brunch is the meal of choice. If you are looking for a DIY brunch that will rival any fancy restaurant try these recipes. You will look like you slaved over this extravagant meal but still having time to visit with friends and family.

...and as always it will be much less expensive then a $16-$22 per person brunch at a local restaurant.


Seasonal Quiche

1 1/2 to 2 cups Filling (Fully cooked)
Pie Crust (Store bought - no one knows the difference)
Cheese (The more the merrier)
Eggs (5-8)
Milk, cream, or half & half

Fillings can be seasonal vegtables, meat, or any combo you want that would sound like a good omlette.
Here are some I really like:
Bacon, broccoli, and onion with parmesan cheese
Mushroom, spinach, and onion with munster cheese
Sausage, Peppers, and onion with American cheese

Cook up filling and season with salt and pepper. Place one pie crust in greased pie pan. Put filling and cheese in pie crust. Beat eggs with a splash of milk and pore over filling.

Place quiche on cookie sheet (to protect from spillage)  in oven at 325 degrees for aprox 45 min or until top is brown and the center if firm.

Cool slightly and server or store in frig or freezer and reheat when needed.


Caprissi Salad

Tomatoes
Mozzarella Cheese
Basil
Olive Oil
Balsamic Vinegar
Salt

Thinly slice tomatoes and mozzarella cheese. (to get beautifully think slices of cheese make sure the mozzarella is cold and use a bread knife to slice it). Organize the tomato and mozzarella on a plate alternating the two. Chop up basil leaves and place on top of the dish. Drizzle with olive oil and balsamic vinegar. Finish off this simple dish with a pinch of salt.


Bread with Herb Butter


I love this dish because it is ridiculously simple and a huge hit with all ages.

Stick of salted soft butter
Herbs of your choice
Garlic Powder
Bread

Some herbs I have tried in different combos are:
Rosemary
Green onion
Basil

Finely chop herbs and mix with soft butter and garlic powder. Serve with bread or your choice.


Fruit and Dip


Seasonal fruit
Fruit yogurt (6-8oz cup)
Cool Whip


Fold fruit yogurt into a container of cool whip. Place dip in a fancy bowl and serve with assorted fruit.


Peanut Butter Brownie Bites

Boxed brownie mix (made by box directions)
Peanut butter chips
Can of chocolate frosting
Peanut butter cups


Make brownies in mini cupcake wrappers and place a few peanut butter chips on each brownie before baking. Place a dollop of chocolate frosting (I used the can for this recipe to save time) on top of the cupcake and then place half a peanut butter cup in the frosting.


Champagne Punch

Inexpensive champagne
Ginger Ale
Juice (I used V8 splash)
Ice
Fruit (Optional)

Mix a bottle of each drink together in a nice punch bowl with ice and fruit.


I hope this spread inspires you to take brunch head on.

Tuesday, May 24, 2011

Collin and Angela's Wedding

Sorry my posts have been so few and far between. I have been having computer issues and of course the spring is always a crazy time of year.

Enough of the excuses and on with the show...

My cousin got married at the beginning of May to a wonderful woman named Angela. They had a beautiful church wedding in NYC and then a reception in Jersey City overlooking the New York skyline. They did a lot of research in NYC for a reception venue but found Jersey City to be much more reasonably priced and had a better view of the city skyline. Here are some pictures of their big day!


View of the skyline from the Jersey City side of the river.


Sushi Bar at the cocktail hour


My mom's first martini - ever! (not of the night)
Appletini if you wanted to know


Outdoor patio where the cocktail hour was head. It looks over the Hudson River.
(No planes landed on the river that day. Thank God!)


A beautiful mixture of tall and short centerpieces along with round and long tables.


Cake by the Cake Boss (Beautiful but not so yummy)


Two different views from the reception ballroom.
Left is NYC and right is the Statue of Liberty and Ellis Island.  


Monday, May 23, 2011

Welcome to the World Maya!

This past February I posted images from my sister-in-laws baby shower. Baby Maya was born May 8, 2011 (Mother's Day). Mom and baby are very happy and healthy!

Two days old

Maya with Uncle Mike

Tuesday, April 26, 2011

Will & Kate's Big Day


I just spent the last few days in London just days before the big royal wedding. There definitely is a buzz about the wedding and some knick-knacks, but it was refreshing not to have it shoved down your throat every minute. I was watching a late night show in Wales Friday night and humored by the comics making fun of Americans wanting to capitalize on everything they can. They talked about Americans wanting the wedding to take place in the middle of the night so American's can watch it live and that there was a need for commercial breaks so more ads could be run. This is so true - I could have watched a whole night of TV last night about the royal wedding her in the US. The special I watched was so ridiculous too, the show was grasping at straws to find more royal wedding crap to talk about. They would have interview a bum that lived near Buckingham Palace if they could find one.

I found it refreshing to remember even the biggest wedding of this decade doesn't have to be blown out of proportion.  I love wedding hype but you don't need to feel the growing pressure to go over the top. Don't forget to step back before your big day consumes you.

Westminster Abby where Will and Kate will marry

Friday, April 8, 2011

Photography: Picking your Photographer from the Sea of Options

Picking a photographer can be a difficult task because you want to have the best pictures you can for a "once in a life time" event but normally your budget doesn't allow for the $20,000 photographer to the stars. I really don't recommend cutting too many corners by letting a friend do your photos unless they are a professional or just using disposable cameras on the tables at the reception, you only have one chance to get it right, but there are ways you can keep it reasonable.

This photo is during a first look. A fist look is photographing the bride and groom seeing each other for the first time before the wedding instead of waiting to see each other walking down the aisle. This would definitely be a modern concept.

Here are some tips to help you find what you want in a photographer without feeling like you need to pay through the nose to get good quality photos.

1. Know your style: Wedding photo styles have changed in the past few years and there is a lot more to think about when choosing these days so you should know what style(s) you want. To start there are the traditional photos consisting of posed shots of the bride and groom, wedding party, or family. Next there is also the growing trend of photojournalistic wedding pictures which are more natural and meant to capture the moments as they happen. Finally there are some photographers who are finding creative ways to put a spin on the traditional by posing the wedding party or bride and groom in fun artsy ways or using creative compositions. Before you go photographer shopping check out all these styles online and know what you like. Many photographers will mix their modern style with traditional poses if you ask because no matter how progressive you might be Gramps and Gram will still want to see the bride and groom with their attendants lined up by their sides.

I love this photo! It is so telling of my husbands personality and way better than a stuffy group shot. 

2. Ask Around:Word of mouth is still a great way to find what you want. Ask friends or co-workers who they used for a photographer. They can be non bias references for you but please don't use this as your only criteria for hiring a photographer. Still do your homework, ask questions, and check out their work.


This is a more traditional pose. 

3. Look at Their Portfolio: Once you know what you like, look at the photographer's portfolio. Ask to see multiple weddings they have photographed so you can see what they can do and if they have a variety of ideas or if they stick to some basic shots. Ask questions this will help you get to know the photographer and get a feel for their style. Finally tell the photographer what you want and see if they have any examples they can show you. Don't feel that you have to sign a contract with someone until you are satisfied with what they do. If you aren't happy keep looking around.

I just love this picture. It is so beautiful and modern. 


4.Match Personalities: You will spend one of the biggest days of your life very intimate with two people- your new spouse and your photographer, so you need to make sure you like them (Hopefully by this point you know if you like the spouse-to-be or not). The best way to do this is to have engagement photos done. It gives you a chance to know your photographer and their style before your wedding day. Many wedding packages include the engagement photos these days or you can ask for a deal if you book the wedding and engagement photos together.


5. Film vs. Digital: Photographers use film, digital, or both. Some people believe film is better because you can get better quality photos but frankly with modern technology it is difficult to tell the difference if there is any between the two. Ask which type(s) of photos your photographer will be taking - photographers can charge you more for film and add extra charges in the middle of you big day if they run out of film. If you have your heart set on film photos make sure to leave room in your budget for some extra expenses.


This is one of my favorite photos from my wedding. It is so simple but says so much about what I was going for. It also reminds me of my childhood as I have spend many Sunday mornings in those pews. It is made so fantastic by the use of great compositional skills. (I won't bore you to death with art lingo but a little know-how goes a long way.)

6. Lighting in the Church: If you plan on having your wedding in a church or dimly lit area ask your photographer if their camera can handle dim lighting. Most churches don't allow flashes so your photographer needs to have the right equipment to take quality photos. Ask to see images they have taken in a church without a flash.

A photo taken by one of my guests with just a regular camera.

I was shocked to see how poorly my guest photos turned out in the church lighting. I am very glade Jessica, my photographer, had the right camera. You can really see the difference.


I hope this information helps you make a better educated decision in your hunt for a wedding photographer.


Check out two of my photo friend's fantastic work at:
http://www.alannascullyblog.com/
http://jmphotographyblog.com/

Sunday, April 3, 2011

You can now officially get EVERYTHING at Costco!


I might be a year or so too late to be the proud owner of a Costco wedding dress but brides-to-be check out this new addition to Costco. 

Costco is now carrying a designer line of six wedding dresses designed by Kirstie Kelly. The dresses range from $699-$1,399. While I don't consider $1,399 to be super cheap and you can find dresses for less- these dresses claim to be very high quality and 40% cheaper than they would be sold in a salon. For some brides this may be the way to go, as the material and construction of your dress may be super important to you but just too expensive for you to get from a traditional salon. 


Currently these dresses are only available at a traveling Costco trunk show right in the middle of the store between the miles of toilet paper and gallon buckets of ketchup, but they should be available to all Costco customers very soon. 


One advantage to these dresses besides the price is the speed at which you can get them. This is one "high end salon" where you can walk out same day with your dress in hand. Plus if you are a VIP Costco member you can get 2% back! Oh how I love a good deal :-) 


Thursday, March 24, 2011

Chocolate Covered Spoons

A simple favor or treat to spruce up an event are chocolate covered spoons. They are simple to make, VERY cheap, and look classy.

Chocolate mint spoons for a baby shower


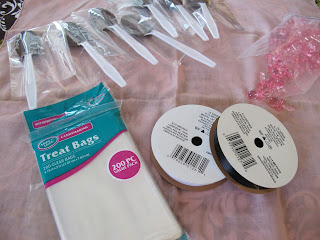
You will need plastic spoons ($1), chocolate chips or Andy's Candies ($2), small treat bags ($3), ribbon of your choice ($2), and any little extra charm= $8!


Melt the chocolate in a double boiler. Prep a cookie sheet with wax paper or a non-stick baking mat. Dip the spoons in the chocolate, making sure to cover the bottom completely, and tap the handle of the spoon on the edge of the bowl to get rid of any extra chocolate. Rest the spoon on the edge of your cookie sheet to keep the chocolate level (If your cookie sheet doesn't have an edge create a snake out of tinfoil and use that as your rest). Allow the spoons to cool completely before placing them inside their individual treat bags. Close the bags with ribbon and tie a small charm into the ribbon.

*To add color drizzle colored chocolate over cooled spoons or add sprinkles to the spoons before they cool. 


Add to your coffee or hot chocolate to make it a decadent treat! Enjoy!

Saturday, March 19, 2011

Winter Lips

Sick of chapped pealing winter lips and have a big event to go to? Try this little trick to get rid of that dead skin without buying every expensive lip balm on the market.


Dip a damp finger in sugar and rub it on your lips for approximately a minute to exfoliate the dead skin. Rinse off your lips and apply a simple chap stick (I like carmax which is $0.89 a stick). If you want add lipstick and you are ready to go!

Sunday, March 13, 2011

Recipes to Make you a First Class Chef on a Shoe String

Crack dip on Italian toast


Hosting an engagement party, shower, bachelorette party, or adult birthday shindig? Here are some of my favorite stand by recipes that will impress, even if your kitchen is a foreign territory to you.

These are all "no recipe recipes" that are so easy to make and adjust to your taste. Have fun and play around with them.


"Crack Dip" (This is a HUGE family favorite that is so good you get addicted to it like crack)

Reduced Fat Cream Cheese (at room temperature)
Soft Butter or Sour Cream
Craisins
Walnuts
Pesto (1- 1 1/2 Tbs per pack of cream cheese - Progresso is the best and cheapest around)

Mix cream cheese with a dab of butter or sour cream to make the cream cheese a bit more spreadable. Line a dish or Tupperware container with plastic wrap. Place some of the craisins and walnuts in the bottom of dish to make a thin layer, Mix the pesto with the cream cheese and the rest of the craisins and walnuts. Fill the dish with the mixture, cover and refrigerate for later, or flip out onto a dish right away, peel away the plastic wrap and serve with crackers.


Pear and Bleu Cheese Pizza

Pizza Dough or Naan bread (I really like the whole wheat dough from Trader Joe's)
Pears
Bleu Cheese (you can sub goat cheese or any other strong cheese you like)
Prosciutto (Crispy Bacon will also do the trick if you can't get Prosciutto)
Olive Oil
Corn Meal

Place a pizza stone in your oven ($10 at Walmart if you don't own one -- they are a great investment) and preheat your oven to 425 degrees. Cut up the prosciutto and crisp it up in a frying pan. Roll out dough on a floured surface. When the oven is preheated take out the pizza stone. Coat stone with corn meal or flour. Carefully place dough or pre-made naan on stone. Top with a little olive oil, bleu cheese, crisped prosciutto, and thinly sliced pear. Pop pizza stone back into your oven on the top shelf, turn off the oven and turn on the broiler to low. (This will allow the hot stone to cook your crust while the broiler will give you the brick oven look and taste by cooking the top very fast) Cook for 5-9 min (depending on the density of your crust) until your pizza is bubbly and golden brown.

Cut into slices for a main dish or smaller pieces as an appetizer.


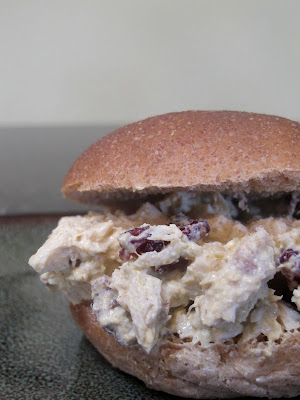
Curry Chicken Salad

Poached Chicken Breasts
Plain Greek Yogurt (Not Vanilla)
Mayo
Curry Powder
Craisins (Sub fresh grape halves if you want)
Walnuts
Salt and Pepper

Poach chicken breasts, allow to cool, and cut into small cubes. Add yogurt and a little bit of mayo to coat. Season with curry powder, salt, and pepper to taste. (Add curry powder a little at a time until it is rich in color and taste -you might need more than you think). Mix in craisins and chopped walnuts.

Serve with crackers, pita, or in finger rolls. 


Citrus trifle made with a lemon box cake, oranges, mango, and peach yogurt.

Trifle 

Angel Food Cake (or cake of your choice)
Seasonal Fruit
Cool Whip Light
Yogurt (a flavor that will go well with your fruit)

Pull cake apart into small pieces with your fingers. Slice up fruit (Put a small amount aside for decoration). Fold yogurt into 2/3 of the cool whip. Repeatedly layer the the cake, fruit, and yogurt mixture in a trifle bowl, glass dish, or individual clear cups until you run out of ingredients. Finish off the dish with the remaining cool whip and pieces of fruit.

This trifle is great as a light dessert or a dish for a brunch.


*A special thanks to my husband Michael for helping with quality control and dishes as
I photographed these recipes for you.

Sunday, February 27, 2011

Candy's Shower

Today I went to my sister-in-law's baby shower and it was a blast. She had a less traditional open house shower which was so nice. You could mingle, eat, drink, and the mom to be opened gifts as the people arrived so there was no three hours of doating over baby crap and not really getting to spend time with the guest you came to see. It was much more personal.


Yes those are real high healed zebra print baby booties.

Sock monkey basket from the Dollar Tree- Super Cute!


A petit guest testing out the goods!


A new crocheted pink pig to match the one Candy had as a baby.


These next two pictures are after a few Bloody Marys


Can we say 1992!